Client
- Main areas
- Menus
- Status bar
- Pages and windows
- Connection to the Server
- Shift handover
- Commands
- Control
- Object panel
- Reading values and colours
- Equipment panel
- Event panel
- Files panel
- Main views
- Related views
The graphical client is the main operator application. It provides access to diagrams, tables, graphs, event windows, configuration tools, and data export functions.
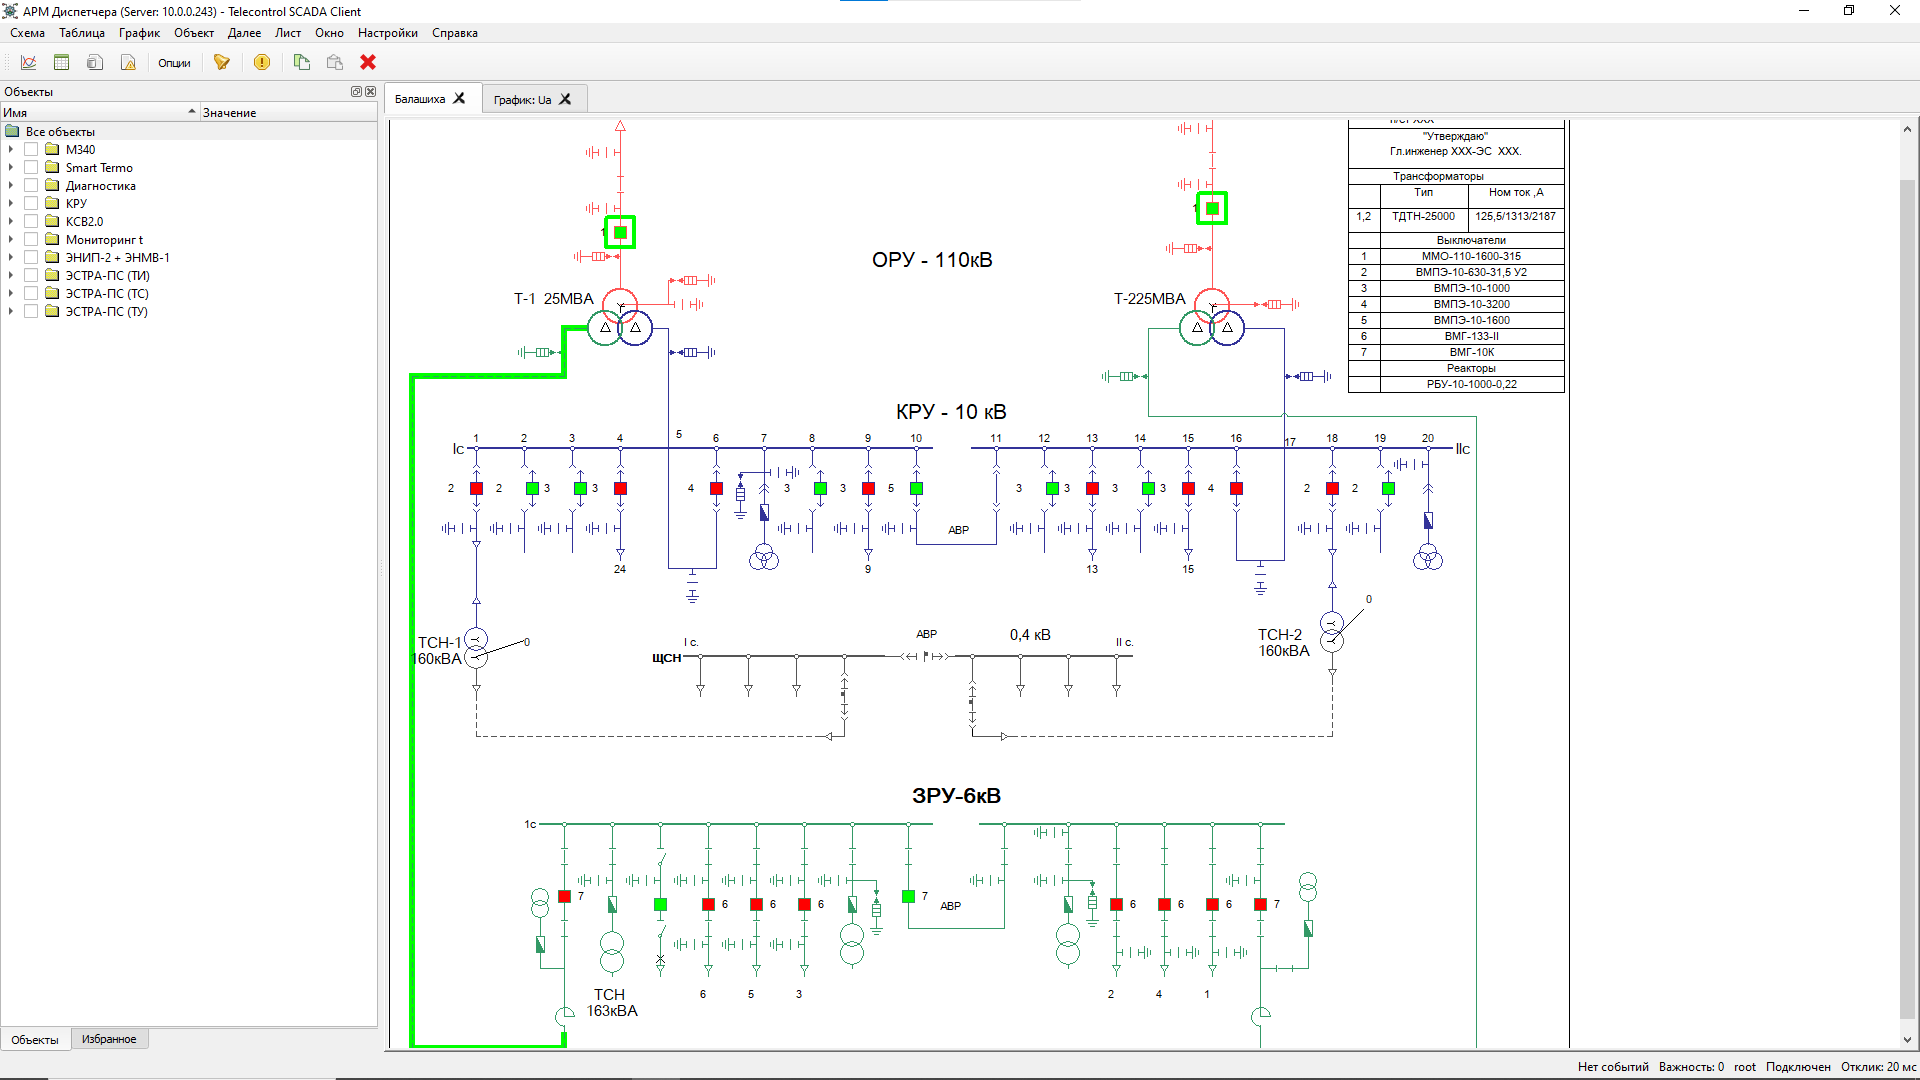
Main client window:
Main areas
The main window contains the title bar, the main menu and a status bar. A command toolbar below the menu is hidden by default (see Commands). Operators work with multiple views inside pages and can switch between open windows without leaving the application. The window’s regions are described in detail on the Operator workbench page.
Menus
The menu bar provides these main groups of commands:
- Display: open available schematic displays
- Table: create tables, user tables, data tables, and group tables
- Graph: create new graph windows
- Item: the commands that apply to the selected object or device and to the active window — the same as the context menu
- More: open the current-events panel (Events) and the Event Journal, the object, hardware and file panels, engineering and configuration import or export tools, and Connect to Server… / Disconnect from Server (see Connection to the Server)
- Page: create, rename, duplicate, delete and switch pages
- Window: rename, close, restore, and favorite open windows
- Settings: one item, Settings…, which opens the settings screen
- Help: open online documentation or show client version
The settings screen groups the settings into categories:
- Appearance — Language, Colour scheme and Style.
- Events & alarms — Sound Alarm on Event, Show Events on Arrival, Hide Events on Acknowledge, Flash Main Window on Event. See Alarm annunciation.
- Control — Control Confirmation (on by default) and Control Success Message. See Control.
- Workspace — Toolbar (hidden by default) and Status Bar, both per client window.
- Displays — Show Modus topology, which draws the topology layer over Modus displays, and the Open Displays Folder action.
See Settings for the screen itself. Ctrl+K opens the command palette: search for commands and signals by name.
Status bar
The status bar shows:
- the number of unacknowledged events and the highest severity among them
- the severity threshold (“Severity: N”) for the current-events panel; it is changed from the panel’s context menu, Severity → Custom…
- the active user name
- the connection state: “Connected” or “Disconnected”
- the Server round-trip time, “Server: N ms” (“No response” while disconnected)
Pages and windows
The central workspace is divided into pages. A client session can have
multiple pages, but only one is visible at a time. Pages can be created,
renamed, duplicated, deleted, and switched from the Page menu, or from the
page buttons on the
section rail.
Windows and panels can be arranged freely inside a page. They can be
docked side by side, stacked as tabs, or restored from the Window
menu after accidental closure. The recycle list keeps the 10 most
recently closed windows.
The Window -> Favorite command stores a window together with its
content under a user-defined name and folder. Favorited graphs and
tables also appear at the bottom of the corresponding Graph and
Table menus for quick reopening.
Connection to the Server
The status bar shows the connection state, “Connected” or “Disconnected”, with the round-trip time “Server: N ms” beside it. When an answer takes longer than 3 seconds, the time gains a “no response” marker and a warning is added to the event panel.
Losing the connection. When the connection to the Server drops, the client adds a warning to the event panel (“Connection to server … lost. … Reconnecting in N seconds.”) and reconnects by itself: the first attempt after 5 seconds, then every 30 seconds until the connection is back. Once it is, the event panel shows “Connection to server established. Login successful.”
Caution. The connection-lost warning does not by itself sound the tone or the spoken announcement (see Which events raise the alarm). While the status bar reads “Disconnected”, no new values or events arrive from the Server and control commands are not carried out — do not act on the values on screen.
Connecting by hand. More → Disconnect from Server and More → Connect to Server… end the session and open the sign-in window. Only one of them is available at a time: the first while connected, the second while disconnected.
Session ended from another workstation. If someone signs in with the same account on another computer and ends your session (see Shift handover), the client says so in the event panel (“… These credentials are being used to log in from another workstation.”) and does not reconnect by itself.
Shift handover
Each operator works under their own account: the event journal records who acknowledged an event and whose action caused it, and the workstation’s settings and pages are kept in the account’s profile on the server.
To hand over a shift:
- The outgoing operator chooses More → Disconnect from Server. The client saves their profile, ends the session and opens the sign-in window.
- The incoming operator enters their own name and password.
If the sign-in window is closed, the client stays disconnected; sign in with More → Connect to Server….
On a shared workstation leave “Sign in automatically next time” unticked: with it, the client signs the last account in by itself on the next start. To skip automatic sign-in once, hold Ctrl while starting the client.
If the account is not allowed several sessions at once and is already in use on another computer, signing in asks “The specified username is already in use by another session. Disconnect the open session and continue?”. Answering yes ends the session on the other computer, whose client then stays disconnected.
Commands
The commands for the selected object or device are in its context menu (right mouse button) and in the Item menu. The command toolbar below the menu can show the same commands; it is hidden by default and is turned on with Settings → Settings… → Workspace → Toolbar. A command that does not apply to the selection is greyed out, and hovering it shows why.
Object commands
For the selected object you can open related views or perform actions such as:
- Graph
- Table
- Display
- Data
- Summary
- Event journal
- group table
- Acknowledge — acknowledges all of the object’s unacknowledged events
- Unlock — removes the object’s blocking (available only while the object is blocked; see Manual input)
- Control… — a control command (see Control)
- Manual Input (see Manual input)
If a matching window is already open for the same object, the client switches to it instead of opening a duplicate.
Device commands
For the selected device you can open:
You can also:
- enable communication with the device
- disable communication with the device
- force a full poll
- synchronize the device clock with the Server clock
For retransmission projects, the client edits a destination device’s retransmission table — the rules by which selected objects are forwarded to upper-level systems. See Transmission rules.
Common commands
Common commands include printing the active window, opening the event window, and Acknowledge All. With the event journal or the event panel active it acknowledges only the events that window shows, after its area, severity and object filters; from any other window it acknowledges every unacknowledged event in the system (see Event panel).
Control
A telecontrol or teleadjustment command is issued with Control… — in the object’s context menu, in the Item menu, or with the button in the Inspector. It needs the Control privilege.
The command opens the “Control” dialog: the object’s name, “Current value:” and “New value:”. For a discrete (TS) object the new value is picked from the list of states (the state opposite the current one is proposed); for an analog (TI) object it is typed as a number. The “Execute” button sends the command.
If the object has a control permission condition, the dialog has a “Condition:” row. It reads “Satisfied” or “Unsatisfied” and updates live. While the condition is unsatisfied (or its value is bad), “Execute” is disabled.
Command confirmation
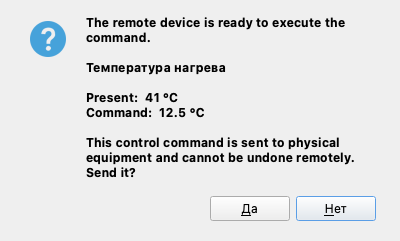
The Control Confirmation setting (Settings → Settings… → Control) is on by default. While it is on, before a command goes to the equipment the client shows a confirmation box: the object’s name, “Present:” and “Command:” — the present and the commanded values — and the warning “This control command is sent to physical equipment and cannot be undone remotely. Send it?”.
The box’s default button is “No”: pressing Enter cancels the command. To send it, choose “Yes”.
Caution. With Control Confirmation off, the command goes to the equipment as soon as “Execute” is pressed, with no prompt at all, and in two-stage control the execute stage follows the select stage automatically, with no pause for the operator. Do not turn this setting off at an operator workstation.
Two-stage control
When an object has two-stage control enabled, the command reaches the device in two stages, as defined by IEC 60870-5 (SELECT/EXECUTE):
- Select. On “Execute” the client sends a select command at once, without a prompt. The device reserves its output for the requested value but switches nothing yet.
-
Operator confirmation. The prompt is shown only after the select succeeds, which is why it opens with “The remote device is ready to execute the command.” It then reviews the present and commanded values and warns that the action cannot be undone remotely, as in one-stage control:
- Execute. Answering yes sends the execute command, and the device switches the circuit it already reserved.
Answering no sends a cancel, so the selection is released at once instead of staying armed until the device’s own select timeout expires. Drivers that do not implement cancel reject it; that rejection is not surfaced to the operator, because the selection lapses on the device timeout regardless.
One-stage control is a single value write and uses neither stage; the confirmation box is shown before that write.
Command result
While the command runs, the dialog’s status line shows “Preparing to control…” or “Controlling…”.
- Success. The dialog closes. The Event journal gets the Server’s “Control - Done” event («Управление - Выполнено»). When the Control Success Message setting is on (it is by default), the event panel also shows a Client message naming the signal and the value sent, ending “Operation completed successfully”.
- Failure. A message box titled “Control” (or “Manual Input”) shows the reason, for example “Not enough rights to perform the operation.” The control dialog stays open so the command can be retried. The event journal records a “Control - Failed (…)” event with the error code in brackets, for example “Control - Failed (Bad_Timeout)” («Управление - Ошибка (Bad_Timeout)»).
The same setting turns on messages for other successful operations — configuration edits, object creation, password changes, unblocking. A failure is always reported, whatever the setting.
Manual input
Manual Input opens the “Manual Input” dialog: “Current value:”, “New value:” and a “Lock:” checkbox. The “Write” button writes the value. No confirmation box is shown for manual input, whatever the Control Confirmation setting.
A manually entered value carries the [Р] (manual) quality flag.
- Without blocking, the entered value holds until telemetry next arrives from the device, which overwrites it.
- With blocking (“Lock:” ticked), the Server ignores telemetry from the device and the manual value stays. The object carries the [Б] (blocked) flag.
When the dialog opens, “Lock:” shows whether the object is blocked now. Clearing the box during manual input does not remove the blocking: to remove it, choose Unlock in the object’s context menu (available only for a blocked object). After that, device telemetry is authoritative again, and the journal records a “Lock removed” event («Блокировка снята»).
Limit values can also be edited from the client. Warning limits must stay within the configured alarm-limit range.
Object panel
The object panel is used to browse the object hierarchy, open related
views, and execute object operations. It is available from
More -> Items.
The tree starts at the top-level objects and groups: no separate root row is drawn, because the panel’s own title already names what it contains.
The panel shows objects grouped by hierarchy. Values and quality flags appear to the right of object names, with a quality dot beside the value. For what the colours, dots and letters mean see Reading values and colours.
Groups show the communication state of the device assigned to that group. In administration mode, objects can also be dragged between groups.
The toggle at the left side of each object or group controls whether the object is included in the current view. Double-clicking an object opens its graph. Double-clicking a group opens a table for all objects in that group.
Reading values and colours
The same marks are used in the object tree, tables, the Inspector and the event journal.
- Grey value text
- The value is bad. Normal text colour means the value is good.
- A "?" after the value
- The value is bad, for example
41 °C?. - Letters in square brackets before the value
- Quality flags, shown with their Russian letters:
[Р]manual input,[Б]blocked,[2]backup channel,[С]no connection,[У]stale,[В]limit violation. The full list is in Quality flags. - The dot beside a value in the object tree
- Green — the value is good; red — bad; blinking yellow — the object has an unacknowledged event (the row's background blinks yellow with it). There is no separate colour for "uncertain" quality. No dot is drawn until a value has arrived, and groups have none — a group shows its device's connection state instead.
- The quality label in the Inspector
- "Good" or "Bad" beside the current value.
- Row colour in the journal and the event panel
- The event's severity: a red fill is "Critical" (800 and above), a yellow fill "Warning" (600–799), and other rows have no fill. Acknowledging does not change the row colour; an unacknowledged event is marked with "●" in the first column. See Severity.
Yellow means different things in different places: in the object tree it is an unacknowledged event on the object, in the journal it is the “Warning” severity.
Equipment panel
The equipment panel is available from More -> Hardware.
It shows the device hierarchy and communication-state indicators for each device, including disabled channels, enabled channels, and non-responding devices.
The equipment panel is also the entry point to:
- Device watch for protocol traffic
- Device metrics for service information
- the IEC 61850 data model view for connected IEC 61850 devices
When communication with an IEC 61850 device is established, its data
model appears as a Model subtree under the device node. See
Protocols and
Development for the
engineering details behind this view.
Event panel
The live event panel shows the current list of unacknowledged events.
Operators can acknowledge an event by double-clicking it or with Acknowledge
in the context menu. Several events can be acknowledged together by selecting
them with Shift (a range) or Ctrl (single rows). There is no keyboard
shortcut for acknowledgement.
Acknowledge All in the context menu acknowledges only the events the panel shows: events hidden by the severity threshold, the area or the object list stay unacknowledged. A collapsed group of repeated alarms is acknowledged whole. When nothing shown is waiting, the command is unavailable.
With Show Events on Arrival on, the panel opens by itself when a new unacknowledged event arrives, and Hide Events on Acknowledge closes it again once the last one is acknowledged. Both are on the Settings → Settings… → Events & alarms screen; they, the alarm tone and the severity threshold are covered on the alarm annunciation page.
The event-row context menu exposes commands for the event itself and, if the event is linked to an object or device, the corresponding object or device commands as well.
Files panel
The files panel provides access to Modus schematic files stored on the Server:
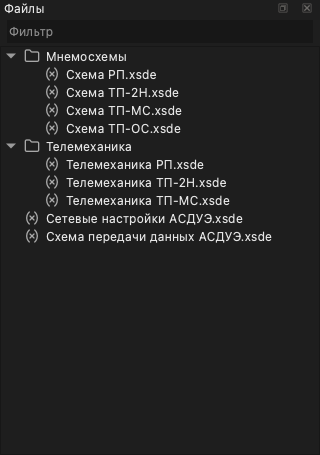
Files can be organized into folders. The context menu supports creating
folders, uploading files, deleting entries, and renaming files or
folders through the Properties command.
Main views
The main operator-facing views now documented in English are:
- Graph
- Table
- Summary
- Data
- Event journal
- Display
- User table
- Device watch
- Device metrics
- Debugger
- Portfolios
- Export and import
- Printing
- Reports and analysis
Related views
See the dedicated pages for: